A step-by-step guide to unlocking SharePoint Agents without a Copilot license.
In our previous article, we pulled back the curtain on SharePoint Agents, showcasing how these AI-powered collaborators can truly revolutionize your daily interactions with SharePoint, turning complex tasks into seamless operations. You’ve seen the vision, grasped the ‘why’ – now, let’s bridge the gap between imagination and reality.
This guide is your pathway to making that vision tangible. We’re going to demystify the process of setting up pay-as-you-go billing for your SharePoint Agents. This isn’t just about flexibility; it’s about accessibility, ensuring you can harness the power of AI on your terms, paying only for what you use, without the need for a full Copilot license. Are you ready to stop just talking about the future of work and actually start building it? Let’s get everything configured, and empower you to deploy your own intelligent agents today!
Table of Contents

Prerequisites
- You need to have an Azure subscription in the same tenant as Microsoft 365.
- You need to have the following roles:
| SharePoint Administrator & *Groups adminsitrator or Global Administrator for accessing the Microsoft 365 admin center and *optional Security Group Creation. |
| Owner or Contributor rights to the Azure subscription and resource group. |
1. Create SharePoint Agents Resource Group
- Sign into Azure Portal https://portal.azure.com/
- Go to Resource groups – Microsoft Azure
- Click + Create to create a Resource Group
- Select Subscription
- Enter Resource group name
- Select Region
- Click Review + Create

- After Validation Click Create

- Resource Group Created ✅
2. Create a SharePoint Agents Users Security Group (recommended)
Think of the SharePoint Agents Users Security Group as your smart access gate. Instead of managing permissions one by one, you create a single group that defines who can use and manage your agents. It’s simple, secure, and scalable—giving you control and clarity while keeping things easy to maintain as your team grows.
- Sign into the Microsoft 365 admin center
- Go to Active teams & Groups
- Select the Security groups tab
- Click + Add a security group

- Enter a name for the Security Group. Example: SG-SharePointAgent-Users
- *Optional, enter a description for the Security Group. Example: Members of this group have access to pay-as-you-go billing for SharePoint Agents.

- Click Next
- Review and click Create Group
- Click Close
- SharePoint Agents User Security Group created ✅
- Add Your Team to the Circle
Now that your SharePoint Agents Users Security Group is set up, it’s time to bring in the right people. Think of this group as your agent’s inner circle—the users who will interact, explore, and benefit from its capabilities. Add the individuals or teams who need access, and you’re not just assigning permissions—you’re empowering your organization to work smarter, faster, and with purpose.
3. Set up pay-as-you-go billing
- Sign in to the Microsoft 365 admin center
- Got to Copilot > Billing & Usage

- Select Add a billing policy.
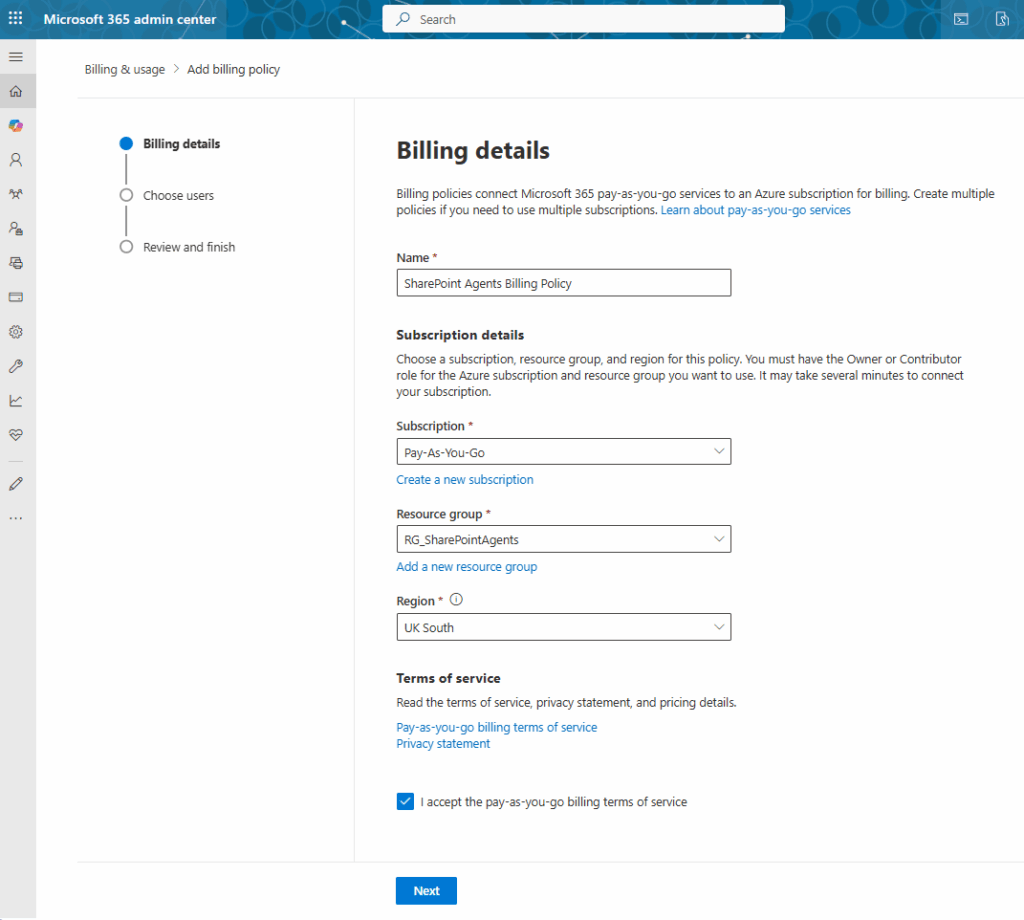
- Enter a Name. Example : SharePoint Agents Billing Policy
- Select your subscription
- Select your SharePoint Agents Resource Group
- Select your Region
- ⚠ Read the terms of service, privacy statement, and pricing details.
- Accept the Terms of Service
- Click Next

- Select All Users or a Specific Group (recommended)
- For Specific group, Select the Security Group created in prevous steps for the SharePoint Agent Users
- Click Next

- Review and Create the Policy
- Click Create Policy

- When Billing Policy has been created , click Connect your services

- Click SharePoint Agents

- Set the Connection status toggle button to Connected
- Click Save

- Set up pay-as-you-go billing completed ✅
4. Monitor usage and costs
Once you’ve set up pay-as-you-go billing for SharePoint Agents, don’t just walk away—watch what happens. Monitoring your usage isn’t just about avoiding surprise charges; it’s about understanding how your agent is being used, spotting trends, and making smarter decisions. With tools like Microsoft Cost Management for Azure, you can track spending, set alerts, and stay in control. Just make sure you’ve got at least read access to the billing resource group—because visibility is power.
5. You’ve Laid the Groundwork—Now Let’s Bring Your Agents to Life
You’ve done the heavy lifting: the setup is complete, the foundation is solid. Now comes the exciting part—building something smart, helpful, and uniquely yours.


![Power Pages - Power Pages version 9.8.2.x Pre-Production Release [MC1233516] 5 pexels pixabay 262367](https://mwpro.co.uk/wp-content/uploads/2024/08/pexels-pixabay-262367-150x150.webp)